

14 November 2011
Painting at the Mission
Our third day in Santa Barbara, we met bright and early in the rose garden out in front of the Santa Barbara mission, and started doing value sketches to decide what to paint. I have to admit I was somewhat disappointed by the block-work facade of the mission, and so I turned my attention to the surrounding neighborhood from the vantage point of the garden. I loved these tall eucalyptus trees, and thought that the combination of those, the palms, and the Spanish tile roof of the house peeking out of the foliage said Santa Barbara every bit as much as would a view of the mission. Palm trees were a constant frustration on this trip--they are surprisingly difficult to capture!--and I am now determined to keep painting them until I get the likeness I want. So far, my results have been either overworked (muddy) or understated (flat), but I hope to get the hang of them soon!


NOTE regarding "Another Trick" (below)
The painting I posted as an illustration of spatter is not mine, it was painted by CINDY BRIGGS, one of the instructors from Make Every Day A Painting. I posted it because it is a GOOD example of spatter (which I have just learned to do and so do poorly!) and also because it had a glimpse of the needlework grid material peeking out of the upper left corner of the photo as an example. Several people commented positively on the work, and I wholeheartedly agree that it's lovely, but it's not mine. Just to be clear.
Our friend the seagull

On the second day of our trip to Santa Barbara, it was dark, stormy, cold and cloudy. After freezing while we painted all morning at the East Beach Cafe, we went to the pier (Stearn's Wharf) for lunch (hot soup being very popular), and then Cindy and Theresa found us a somewhat protected and quite scenic place to paint, on the upstairs balcony (lee side) of a wine bar out on the pier.


The view was spectacular (especially the rainbow), but it was continuously partially obscured by our friend the seagull. This was his balustrade, and he wasn't moving off of it for anything.
So, we drew him in various attitudes, turning him into a flock of seagulls, and painted him. A fun technique with the drips and spatters (this is when we first discovered the genius of the squares of needlework canvas, although it took me awhile to get my spatters even--not in evidence here!).

Another Trick

This is a photo of one of Cindy's luminous demo paintings she did for us, during our wine tasting day in the Santa Ynez Valley. See up in the left-hand corner that little bit of red grid sticking out from behind the picture? It's a piece of plastic needlepoint canvas. You paint the colors on it that you wish to spatter, and then you hold it above your painting and blow through it, and all the paint goes beautifully in a nice even spatter. You can do multiple colors at once, or layer them by doing first one, then adding another, until you have enough spatter. You can use different sizes of canvas (they come very fine to quite large) to achieve different sizes of spatter. Genius! When you are finished, just dunk the piece of canvas into your water to clean it, then wipe it down and put it back in your pack for re-use.
09 November 2011
Vacation photos and studies
 Here is a photo of the East Beach Café, in Santa Barbara on the beach, and below are three small, rather quick paintings done there.
This trip was a new experience for me on a couple of fronts, and I was somewhat frustrated with both my productivity and the quality of my work. First, I have never painted "en plein air" before--my usual spot is my patio table, and my usual subject is either a made-up one from research photos, or something sitting still on the table in front of me, so painting things that don't stay still or constant was different.
Second, I am used to painting large (11x15, 18x24), but when you're working outdoors on the fly AND lugging all your materials and tools with you all day, it pays to downsize; so I bought myself my first small watercolor sketchbook and tried to scale everything to fit it, with mixed success. A couple of days in, I went to the local art store and bought a smaller paintbrush with a good tip, which helped a lot!


The wires on the top of the umbrellas are meant to keep seagulls from perching on them and messing them up.
As you can see, we had a chilly, stormy day for our beach scenes.
08 November 2011
Tips and Tricks
I picked up a few new and useful pieces of information on my watercolor vacation (see post below), and a couple of them were AWESOME so I'm going to share them here.
 1. Mr. Clean Magic Eraser--buy the one without the added chemicals. Cut a small piece (easier to work with), dip it in water and then squeeze/wring it out well. Use it to ERASE paint from your page. You know that dark streak in the shadow that I wailed about in my lamp painting? With Mr. Clean, I can take it out! You have to stroke the paper GENTLY with the sponge, so that you don't abrade the paper so much you can't go back in and paint; but if you use a soft touch and a gradual approach, you can remove things completely or just lighten up muddy areas by bringing in some highlights. For the latter, you can overlay/use a STENCIL so that you can remove just the small bit of paint you want to. Quite a trick!
2. Some of you may already know this one, but it was a revelation to me. All these years I have been applying masking fluid with a brush (messy and inexact), but at this workshop I discovered you can buy it in a little bottle with a tiny spout that you can simply squeeze it onto your page with a controlled flow. Duh.
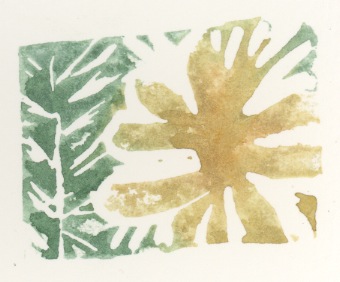
 3. Speedball Lino Cutter Assortment, and Softcut (also made by Speedball): Ever have the yen to do a linoleum carving? or make your own rubber stamps? Frustrated by doing it the old-fashioned way (with wood, linoleum, or erasers)? Carving in Softcut (which is about the thickness of foamcore but carves like a soft, malleable eraser) with lino cutters is SO much easier. Takes awhile to get the hang of it and figure out the positive/negative design, but it's really fun. Here's one I cut on the fly, in about five minutes. I messed up and accidentally cut out one of the petals on the left, but I still like the lino-cut feel to it. Fun to incorporate into a painting! I'm putting these on my Christmas list.
Thanks, Cindy and Theresa!

2. Some of you may already know this one, but it was a revelation to me. All these years I have been applying masking fluid with a brush (messy and inexact), but at this workshop I discovered you can buy it in a little bottle with a tiny spout that you can simply squeeze it onto your page with a controlled flow. Duh.
Thanks, Cindy and Theresa!
Watercolor Vacation
I just got back from a six-day, multi-location watercoloring holiday with Make Every Day A Painting, taught by Cindy Briggs and Theresa Goesling (http://www.makeeverydayapainting.com/). Nearly a dozen of us spent three days in Santa Barbara (one at the beach and two in town), and then moved 30 miles inland to Solvang for three more days, with side trips to various local wineries in the Santa Ynez Valley, and an afternoon in Los Olivos. It was a great break (and much needed, after the year I've had!). We painted, we ate, we drank, we made new friends.... I'll post some pictures and some paintings over the next few days, as I get them scanned. Some I was happy with, some completely frustrated me, but all were instructional.
This was my first painting on the first day. I liked this one pretty well (esp. the colors), aside from the leaning-tower-of-Pisa quality of the clock tower! I had hoped to go back and do another angle, but there were so many other things to paint that I never made it. This is a view of the Santa Barbara Courthouse building, from the back lawn. Yes, there were clock faces on all four sides, they each showed a different time, and none of them was working. (Just in case you were going to point that out...)

This was my first painting on the first day. I liked this one pretty well (esp. the colors), aside from the leaning-tower-of-Pisa quality of the clock tower! I had hoped to go back and do another angle, but there were so many other things to paint that I never made it. This is a view of the Santa Barbara Courthouse building, from the back lawn. Yes, there were clock faces on all four sides, they each showed a different time, and none of them was working. (Just in case you were going to point that out...)

Subscribe to:
Posts (Atom)